I started this posts wanting to demystify docker caching, one of the important aspects of using Docker in an efficient and scalable manner. While researching this topic, I realised writing that a lot of basics about Docker architecture, terminology and concepts are often skipped in posts like this, creating additional barrier to readers starting to learn about this technology.
That’s why the initial post became a 2 part series, including a broader look at Docker containers — of which the first part is in front of you (second part will follow soon, and, possibly more instalments to follow).
Let’s start by looking at how Docker became an important tool in developer’s arsenal.
Why Docker became so ubiquitous
Since the start of the software development industry, there has been a challenge how to efficiently develop and transparently package and deploy software packages on various platforms. This has become particularly prominent with the rise of the Information Revolution and proliferation of Software-as-a-service (SaaS) software solutions and the growth of cloud adoption.
On the higher level, this meant that the software has been developed for a particular platform (e.g. Linux or Windows, or AWS vs Azure) and moving it to a different platform required significant effort through the entire cycle — from development, to configuration and deployment.
The teams and roles have been developed to address the symptoms — development vs operational teams, and then within the operational teams split into technology-specific groups with finely-grained skills sets, adding to the inflexibility of new technology adoption
On a more granular level, the most recognisable effect of the development/deployment paradigm has been ‘it worked on my machine’ mantra whenever there was a production issue that has not been caught during the development process.
Although there have been attempts to address this challenger, e.g. Java containers like Tomcat and Jetty that offered some standardisation but focused on a single LVM platform, or Virtual Machines (VMs) with tools like VirtualBox and Vagrant as developer support, not until the introduction of Docker Containers we felt we’re finally moving to the right direction.
Docker containers are standardised, lightweight and secure environments, defined as code, and packaging the entire runtime for a given application — starting from the kernel, all dependencies as well as the actual application code. Docker containers are platform/language agnostic so can be used to run applications written in any programming language, running on almost any hardware platform. As they are lightweight, docker containerised applications can be run on developer workstations equally well as on production servers. And as a platform-agnostic tool, it can be adopted for any on-prem on cloud-native architectures.
This is where the paradigm shift comes into place: software is no longer packaged as a platform-specific binary artifact (jar, dll, tgz) but as a fully fledged virtual environment in the form of Docker images. This means that developers can run the code locally exactly as it is run on dev, test or prod environments. The operations teams have only Docker images to deal with, with much less need to understand the inner workings of the specific platform they are deploying. And companies and teams are much more flexible in running different applications written in different languages/frameworks, with Docker abstraction allowing for much easier orchestration and abstractions of all moving parts as Docker images — enabling the massive adoption of microservices architectures.
Getting started with Dockerfile and Docker layers
To build a Docker image, we are effectively building the entire runtime environment from the code describing it — Dockerfile. It typically involves a starting point — a well known image with base kernel, e.g. ubuntu or alpine, followed up by installing all dependencies, copying and building the application code and finally running the application. Depending on the number of dependencies and the way they are installed, this can take several minutes or even more (e.g. if dependencies need to be installed from source).
Every time you change or update the application code, you need to build a new version of the image that can be used for deployment. Even though you’d typically only change the application code, the entire image needs to be built from scratch — including all dependencies. To help with the efficiency of the typical development process and shorten the feedback loop cycle, Docker has introduced the concept of layer caching.
Let’s see how it works.
As an example I’ve prepared a simple react app and a dockerfile used to build and run the app in development mode.
The app has been generated using the create-react-app tool (https://create-react-app.dev/docs/getting-started/), and the resulting code and the Dockerfile are available in the github repository accompanying this blog:
Let’s explore the Dockerfile, which describes the image we want to build:
FROM node:12.13.1-buster-slim AS dev

WORKDIR /home/app

# 1. Copy dependencies definitions
COPY ./package.json ./package-lock.json* ./

# 2. Install dependencies
RUN npm install

# 3. Copy our own code
COPY public /home/app/public
COPY src /home/app/src

# 4. start the app
CMD ["npm", "start"]
- FROM command describes the base image we need — in our case its a node image which comes will javascript, nodejs, npm and other tools required by a typical javascript project
- WORKDIR — specifies the working directory within the image — the default location or a home directory
- COPY — copies the files from our local filesystem to the image — at this point we’re copying the application descriptors (package.json files)
- RUN — executes a command — in this case, we run npm install to fetch all project dependencies
- COPY — next two copy commands are copying the source code to the docker image (there is a reason we didn;t copy the code and the package.json at the same time, more on that later)
- CMD — finally, we specify the entry point command for our image — the command that will run when we start the image after it has been built (we’re using standard npm start for that).
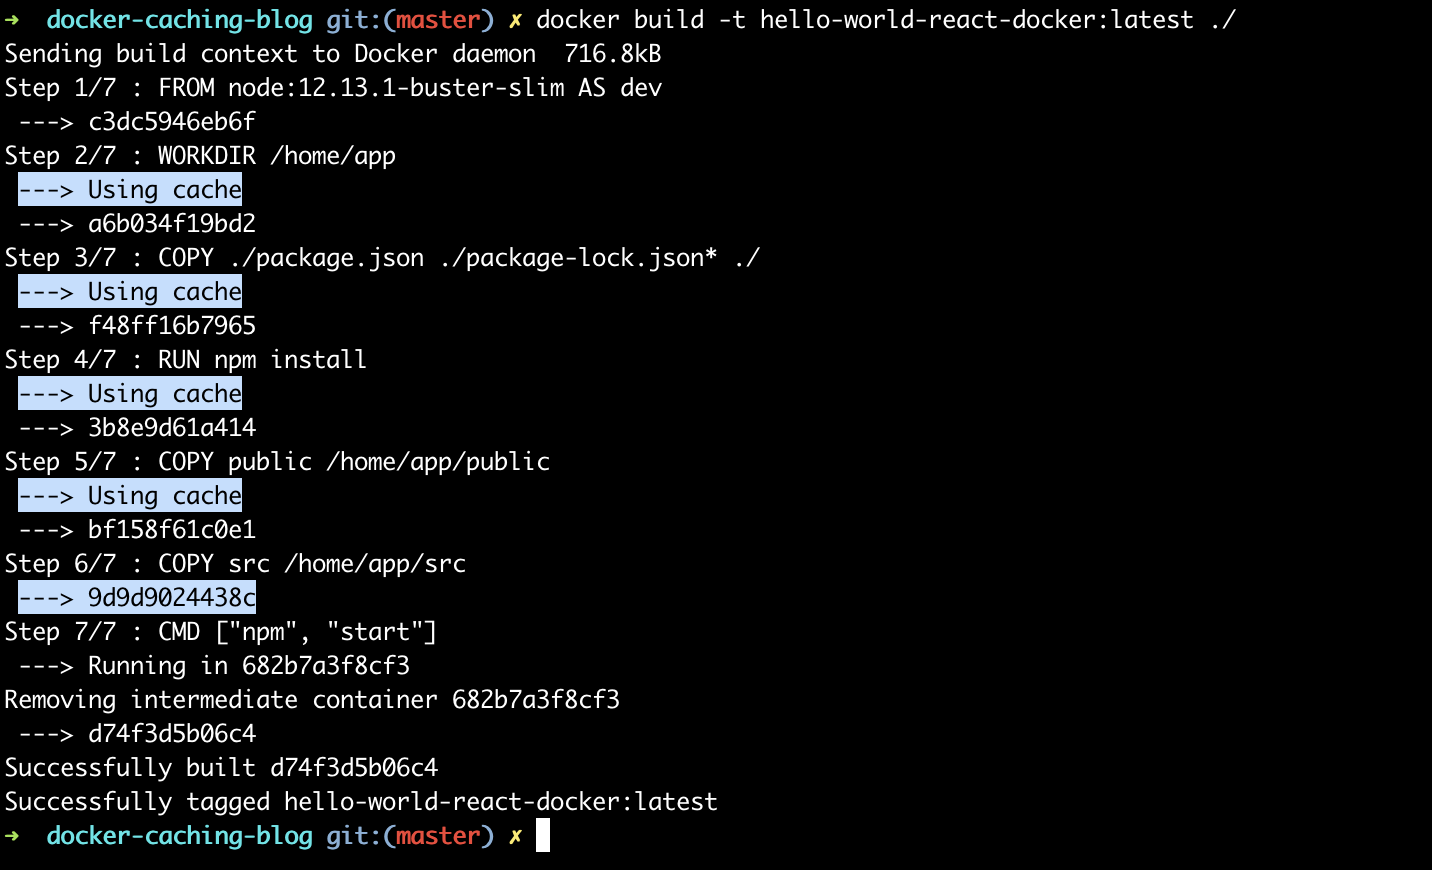
Next step is to build the docker image with our application:
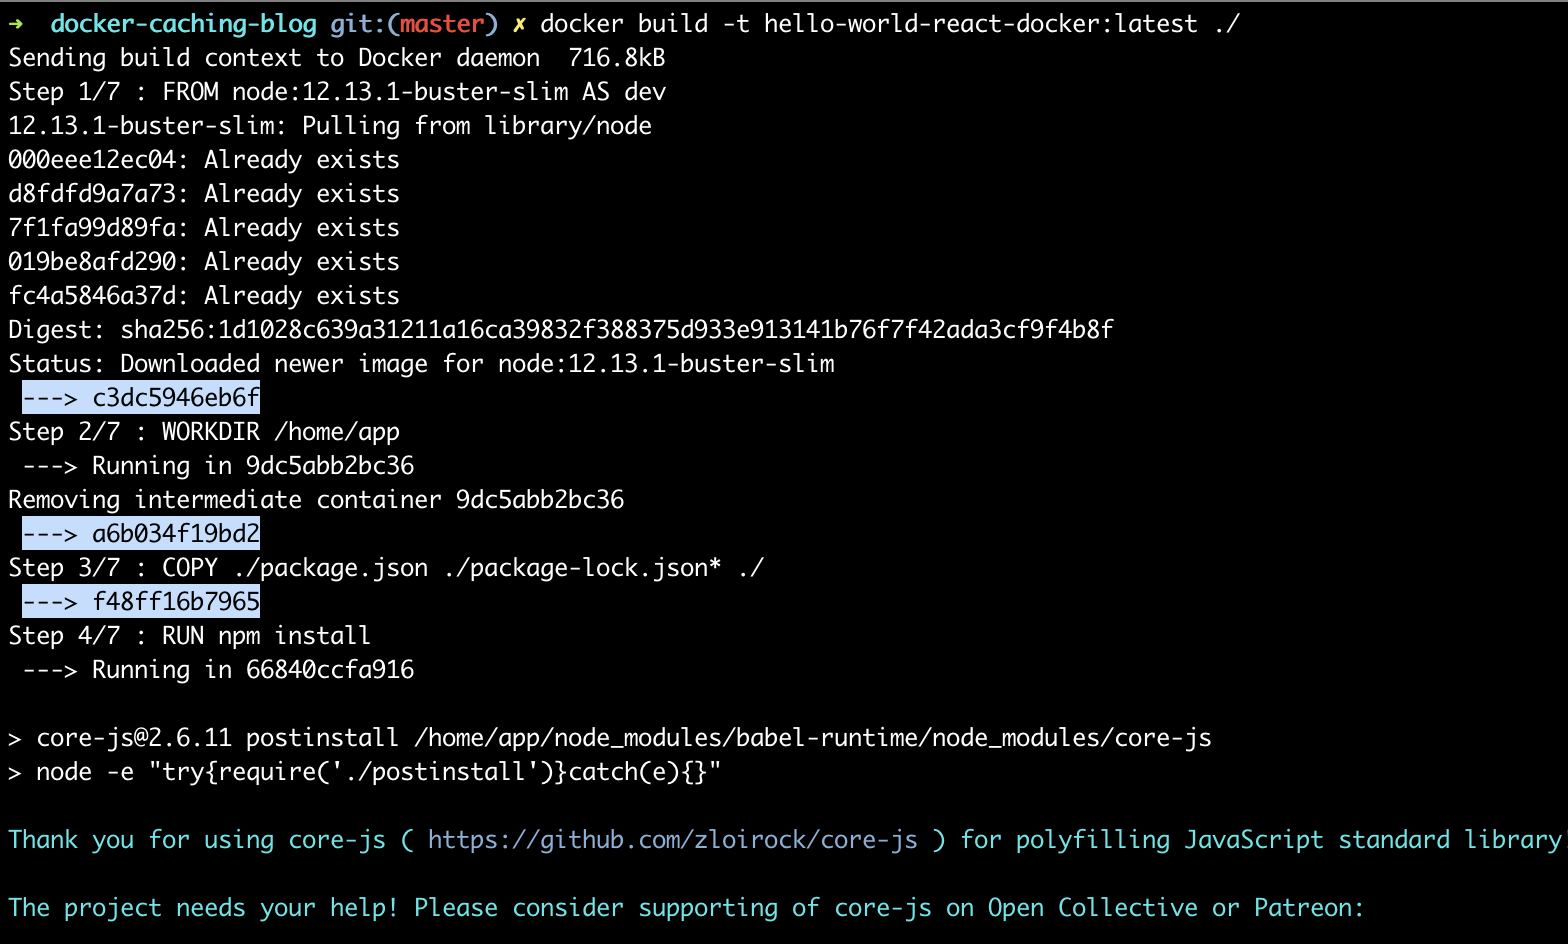
Each command (e.g. line — see output starting with Step x/7 above) in the Dockerfile creates a layer of the docker image, which includes all files in the docker image following the execution of the command. Each layer is saved as docker image state — in the example above, the highlighted output shows the end of each layer, with the unique layer identifier.
First look at docker layer caching
Docker layers are quite handy — as they contain the state of the docker image at each milestone, and are saved on the local filesystem, layers act as a cache. If nothing is changed in a layer (or any layers preceding it), we can simply re-use the files without the need to rebuild that particular layer (e.g. no need to run the command again — which in case of long running commands can save us a lot of time).
To prove this, let’s rebuild the same docker image. Initial build of the image took several minutes (mainly due to npm install command which takes time fetching the dependencies — along with half the internet in modern javascript ;)). We are NOT changing the Dockerfile or the source code — so expect the same image built as a result:
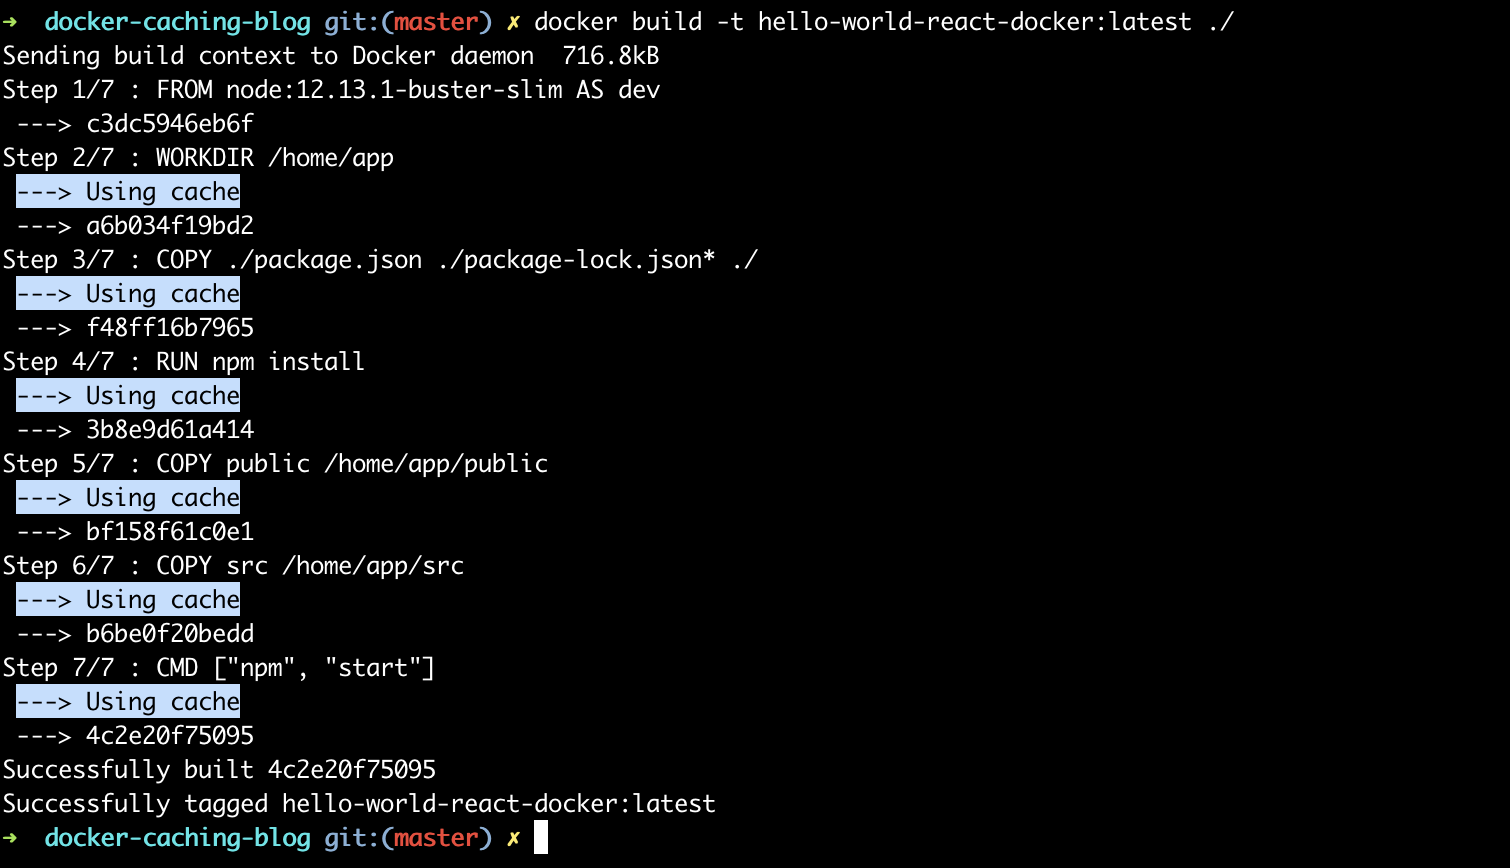
This time the build takes merely 2 seconds — thanks to all the docker layers being already built and served from cache (as highlighted output above illustrates).
What happens when we change the code? Let’s see.
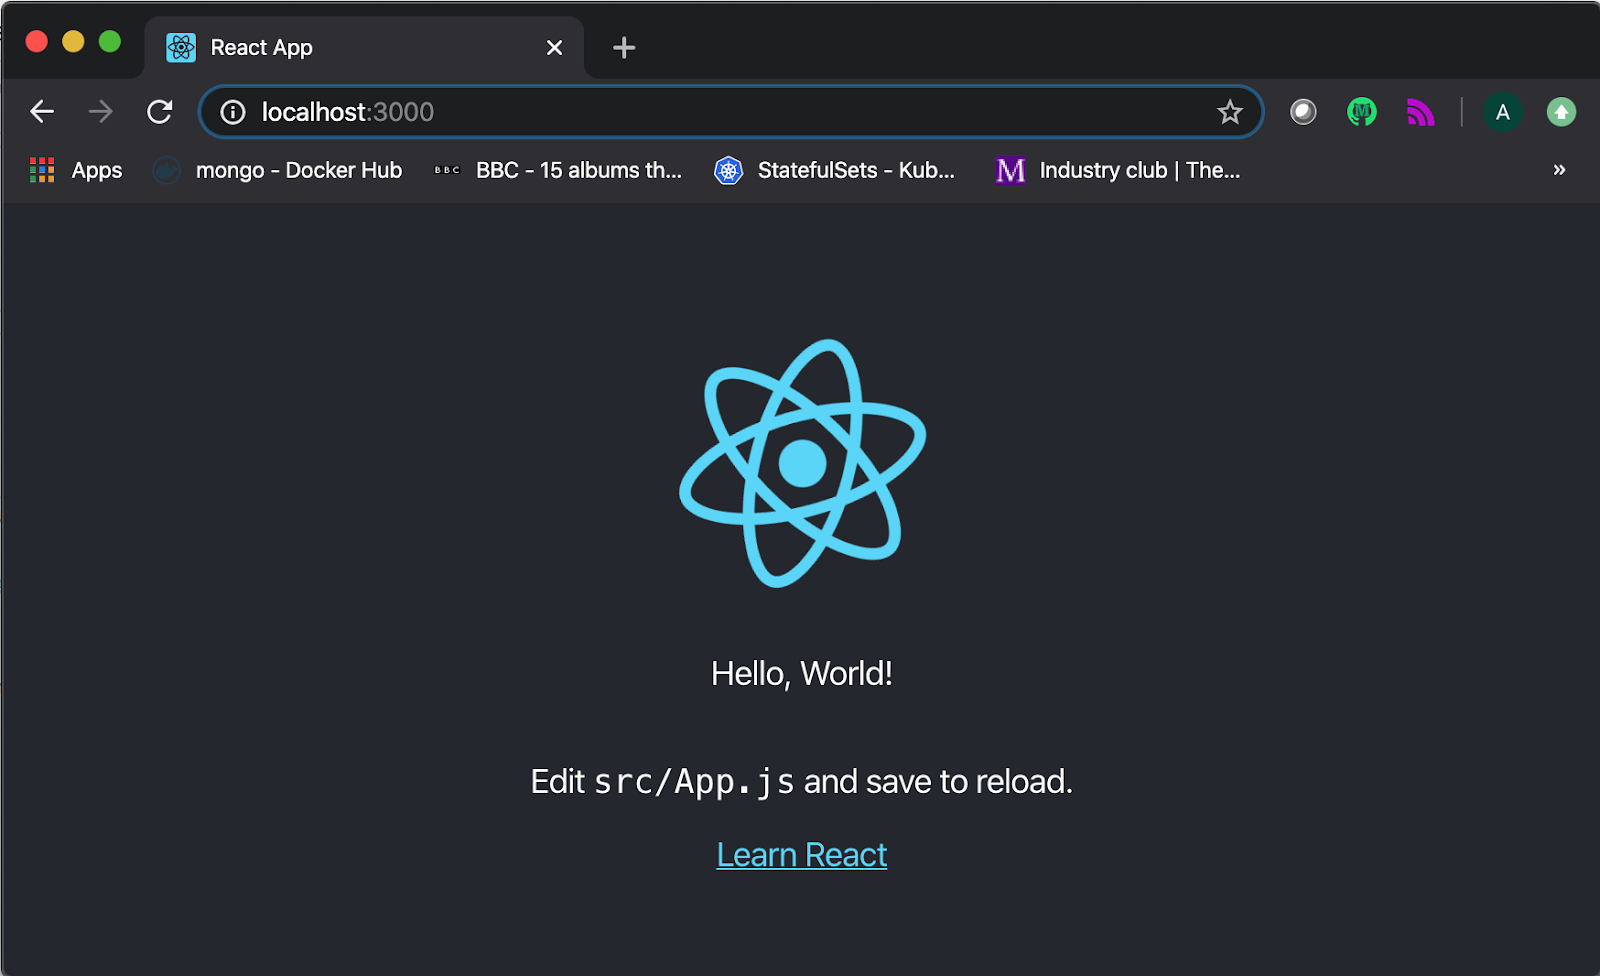
To prove we have a working app built as a docker image, let’s run it:
docker run -it -p 3000:3000 hello-world-react-docker
Opening the browser window at http://localhost:3000 and voila — our app is there, served from the docker image we have just built:
Let’s update the message displayed on the screen: open the src/App.js file and update the text to ‘Hello, World — this is React on Docker calling!’. After saving the file, let’s rebuild the image again, using the same command, and check the output:
The build took around 5 seconds, so a bit longer compared to last run (before changes were made)— but definitely not as long as the first time we built it — why?
As you can see from the highlighted output above ( — > Using cache lines), the first layer that wasn’t used from cache was copying the source code — which is expected as we have just changed the source file to update the displayed message. However none of the previous layers were impacted by this change (including the notoriously slow npm install command) — which meant we could have used the cached version of all previous layers, making a build very fast and efficient.
Running the app again, will display the new message in the browser — so you can confirm that the changes we made have been built into the new docker image.
The question is, how did Docker know which layers it can use from the cache and which needed rebuilding? Let’s explore that in the next section.
We said already that each command from the Dockerfile descriptor will result in a layer — each command also comes with the rules corresponding to it’s caching behaviour. For the commands we used:
- WORKDIR — layer is cached unless the working directory changes
- COPY — layer is cached unless any of the files or directories copied have changed since. This includes renaming files, changing the contents, created timestamp pr permission changes.
- RUN — layer is cached unless the command changes (different script or different arguments)
What is important to reiterate, if any of the layers encounter cache-miss and need to be rebuilt for any of the above reasons, ALL subsequent layers will be rebuilt, regardless of what has changed or not. This is why it’s very important to plan the order of commands in the Dockerfile, to enable most efficient cache usage and best build performance.
This is mostly critical for COPY commands — it is a best practice to split the files and directories copied or added to the docker image, so that files that are most frequently changed are copied as late as possible — as to minimise the effect of the cache miss for the subsequent commands. This is specifically important if there are any commands which are known to be slow and inefficient.
Note: If you are developing more complex javascript projects (server or client side) with docker, head to Eric’s take on best practices for Docker development .
In our example (which is typical for most javascript projects) — the code that changes most is the source code of our application, which is why we copy it last. We also know that npm install command is slow, so we want to make sure that it’s served from the cached layer as often as possible. Execution npm install depends on the package.json files being present, so we copy these files first, then install dependencies, and only then copy the source code.
How will this setup behave in different scenarios:
- Changing the source code — as the last example we run, this is the bread and butter of developer’s work — we change the code, test it, release, and so on, in circles. Because the source is copied to the docker image last, all previous layers are cached, so only last few layers need to be rebuilt and we have the updated docker image ready in seconds
- Changing or adding the dependency — this involves updating the package.json file, which in turn rebuilding all layers below — we run npm install again, followed by copying the source code — this takes longer time, similar to our initial build. But that’s expected — we need to install the dependencies if they change
- Changing the base image — let’s say we upgrade to the latest node version. AS we’re updating the FROM command, which is the first layer encountered by the build process, none of the subsequent layers can be reused from the cache and needs to be rebuilt. This is also common sense — if upgrading the core dependency like the node version, we’d expect to rebuild the entire image to ensure all dependencies are compatible with the change.
This is where we’ll take a break. This post hopefully has given you decent introduction to Docker layers and caching considerations to take into account when defining Dockerfile for your application.
More to follow, and next time we’ll have a look at docker’s microservice-friendly sidekick, docker-compose, and how caching impacts docker-compose development.
Aleksa is a CTO and TheStartupFactory.tech, where he helps to build the foundations of tech startups and growing their young and ambitious teams.